
Plenty of very important elements go to make up a motorhome – gas storage, cookers, heaters, beds and even toilets – but the most important bits are black and round. Yes, that’s right: the tyres really are the single most important part of any motorhome, followed closely by the brakes.
Tyres are the only part of any vehicle that should be in contact with the road. They transmit drive, braking and steering, and support the weight. They are subjected to heat, cold and UV light, potholes and occasionally, kerbs. All in all, they have a pretty hard life.
Then in second place in terms of importance is the braking system. Any problems with the engine or gearbox might mean the vehicle doesn’t go very well, but problems with the brakes could mean that it won’t stop very well – and 3.5t of motorhome with no brakes is a scary thought.
So do you check your tyre pressures regularly? What about the tread depth or tyre age? All of these need to be carefully watched – rubber degrades with age and exposure to heat, cold and sunlight.
These days, a lot of modern vehicles are fitted with a built-in tyre-pressure monitoring system (TPMS), which alerts you if a tyre pressure falls below a certain preset figure.
Many such systems are available as a retrofit, and I’ve fitted these devices to all of our family vehicles. If you don’t have a TPMS, I’d strongly recommend that you get one.
Measure the tread depth of your tyres
When did you last check the tread depth of your motorhome tyres? The legal minimum for road tyres is 1.6mm, but for safety’s sake, it is accepted that 3mm is a more realistic figure.
The grooves of the tyre tread act as channels for moving water in wet weather; the shallower those grooves are, the less water they move.
In addition, the tread must span the full width of the tyre. It is no good having 3mm in the middle and nothing at the edges.
While you’re checking your tyre pressures, have a good look at the sidewalls, too, to check for any signs of damage or deterioration.
An LED torch shone at an acute angle across the tyre sidewall is brilliant for showing up tiny cracks.
If you think tiny cracks are nothing to worry about, just ask yourself: “Will they heal up or get worse?”
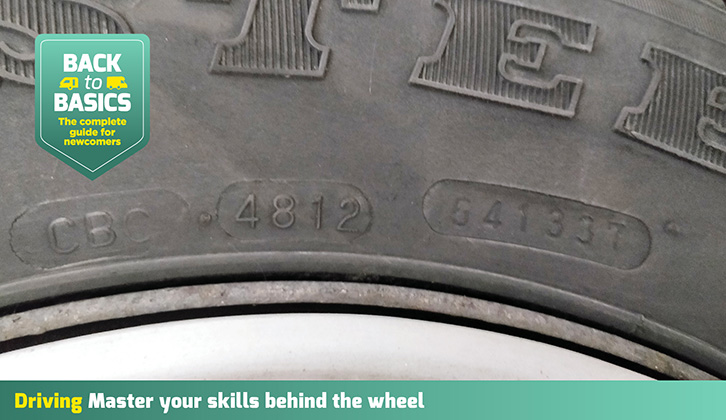
You should also be checking for cuts, lumps and bulges in the sidewalls, and don’t forget the inner sidewall. Finally, check the date of manufacture, which is stamped into one sidewall at the end of what is known as the DOT code.
This is a series of letters and numbers beginning with DOT. The date code identifies the tyre’s week and year of manufacture. From 1 January 1990 to 31 December 1999, it was a three-digit code – the first two digits signified the week and the third, the year of that decade. So a code of 327, for example, would indicate week 32 of 1997.
From 1 January 2000, this changed to a four-digit code, where the first two indicate the week of the year and the last two, the year. So 4812 means week 48 in 2012.
The generally accepted rule is that tyres should not be used after reaching six years of age, although some makers will suggest regular inspections after five, six or seven years.
Annual inspection of braking systems
Brakes are the second most important item. As I said earlier, a 3.5t vehicle with poor brakes simply doesn’t bear thinking about.
Annual inspection of the brakes should be a priority – especially on low-mileage vehicles. I change far more brake pads because they are crumbling owing to lack of use than
I do because they are worn out.
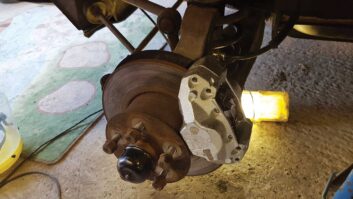
Another problem caused by lack of use is brake discs corroding and pitting on the friction surface, and caliper slide pins seizing up, giving uneven braking. A ’van pulling to one side in emergency braking would be very dangerous.
I once had a problem with my race car’s brakes, when the servo failed at the fastest section of a hillclimb in which I was competing. The servo is a device that, in effect, multiplies the force applied to the pedal.
On my race car, the servo does this by a multiple of about five or six, but in modern ’vans, the multiplication factor could be up to 10 times or more.
The symptom of a failed servo is a very hard brake pedal, which needs a huge amount of pressure to make the brakes work.
Thankfully in the race car incident, the resultant ‘off’ didn’t result in any damage (other than to my pride), but I did prove conclusively that a Mazda MX5 will not go around a tight bend at 60ish miles per hour!
Fortunately, servo failure is very rare (the race car is 24 years old, after all), but we have all become so used to light, responsive brakes, it can come as a shock when they don’t respond as you’d expect.
Possibly having to put 10 times the force onto the pedal in an emergency might be beyond most of us!
The brake system in detail
1 Brake pedal
Pressing on the brakes pushes a small piston in a cylinder filled with hydraulic brake fluid. Liquids are virtually incompressible, so the pressure is transmitted through the fluid equally in all directions.
2 Force multiplier/servo
Brake fluid is squeezed towards larger pistons next to wheels. Change from thin cylinder to wider increases force (force = pressure x cross-sectional area). Servo uses vacuum on one side of diaphragm, atmospheric pressure on other, to multiply the force applied.
3 Brake pad and disc
The force exerted by the brake fluid in the larger piston pushes the brake pad towards the brake disc, which is attached to the wheel.
4 Inducing friction
The pad touching the disc generates friction between the two component parts. This leads to the transfer of energy from kinetic to thermal, as the friction produces heat.
5 Slowing down
Transfer of kinetic energy results in a reduction of the wheels’ – and the vehicle’s – speed.
Want to find out more about driving your motorhome? Then visit our Back to Basics – Driving category, where we’re sharing advice to perfect your driving skills on the road.
Future Publishing Limited, the publisher of practicalmotorhome.com, provides the information in this article in good faith and makes no representation as to its completeness or accuracy. Individuals carrying out the instructions do so at their own risk and must exercise their independent judgement in determining the appropriateness of the advice to their circumstances. Individuals should take appropriate safety precautions and be aware of the risk of electrocution when dealing with electrical products. To the fullest extent permitted by law, neither Future nor its employees or agents shall have any liability in connection with the use of this information. You should check that any van warranty will not be affected before proceeding with DIY projects.
After a good sat-nav to help you with your navigating? Then be sure to take a look at our best motorhome sat-nav round-up, where we share our pick of the devices.
If you’ve enjoyed reading this article, why not get the latest news, reviews and features delivered direct to your door or inbox every month. Take advantage of our brilliant Practical Motorhome magazine SUBSCRIBERS’ OFFER and SIGN UP TO OUR NEWSLETTER for regular weekly updates on all things motorhome related.